Showing posts with label how to make. Show all posts

Monday, May 14, 2012

Sparkling Green Tea

Sparkling Green Tea

A refreshing and easy to make warm weather beverage. Plus it has all the benefits of green tea!


Brewed and cooled Green Tea 
honey or simple syrup or sugar
Plain or Lemon flavored Seltzer water

If using sugar or honey, it's best to add them while the tea is still hot. I make a batch of simple syrup and keep it in my fridge for using in my iced coffees and for iced tea. Simple syrup is just equal parts sugar and water, brought to a boil and simmered for 3 minutes, then cooled down and stored in a covered container in the fridge.

To make the sparkling tea, pour equal parts cooled, sweetened tea and seltzer water in an iced filled glass. Add a teaspoon or however much you'd like of the simple syrup to sweeten. 

Enjoy! 
 recipe from Angela of Windy City Knits

______________________________________________

Sunday, April 29, 2012

Pizza Tonight!

One of my favorite things to make is homemade pizza. I love a classic thin crust with some fresh mozzerella,  garden tomatoes, and fresh basil. I also love to try new and adventurous pizza toppings. Here are a few yummy recipes for you to try.
Pizza Margherita from Martha Stewart

Fresh Ricotta and Red Onion pizza from Smitten Kitchen

Pear and Gorgonzola Pizza from  AllRecipes

A very useful tip I've learned from making homemade pizza is to bake the pizza until just about done and then take it off the pan and cook a few minutes more directly on the oven rack. This extra step allows the middle of your crust to crisp up a little more.
Enjoy!
Angela from Windy City Knits


_______________________________________________

Tuesday, April 10, 2012

Diy Art Wall Decor

Simple do-it-yourself art wall decor to spruce up your home for Spring! 


Mr. Handsomeface diy wall art bubbles

Two Girls Being Crafty Intersecting Circles diy wall art tutorial
Design Sponge diy toilet paper roll wall art
Make & Do Girl's Coffee Stirrer diy wall art tutorial

Go forth and craft!
xoxo, 
Angela from Windy City Knits


_______________________________________________

Monday, December 12, 2011

Tutorial how to make a Christmas Necklace

How to make a Christmas Necklace Tutorial
Edited by JPwithLove  Brought to you by Shadow Jewels

This sweet necklace cna be made with any kind of beads, chain and connector. The possible combinations are endless and easy to make. Stringing the beads on metal pins makes a very sturdy rosary style necklace that will last a lifetime. For this necklace I am using some vintage West German 8 mm pressed glass bead and brass findings.

Difficulty level: Beginner / easy


What do you need for this project?
Tools and supplies

round nose pliers
flat or chain nose pliers
shears or wire cutters
jump ring tool (looks like a ring)
seven 8mm beads more if you use smaller beads
ten 4mm jump rings
about 12 inches of chain 
7 eye pins
clasp
 One bird connector
one lobster clasp
one 7 or 8 mm jump ring for clasp


Use round nose pliers to make a loops

Place a bead on one of the eye pins. Using your shears or wire cutters, clip off the end of the pin leaving about 1/4 inch sticking out


Using the flat nose pliers, bend the sticking out part of the pin are right angles, getting as close as possible to the bead.
Grasp the beaded pin by the eye(loop) with your left hand. Using the round nose pliers in your right hand, twist your wrist to curl the sticking out part of the pin to make an eye.
This is not difficult, but it takes practice. Make several before you start, so you feel comfortable doing it.
You can cut the pin to remove the bead and start over if needed.
Your goal is to make an eye that looks like the first one - same size, same orientation and closed completely. Use the flat nose pliers to straighten and tighten your eye loop. Repeat until you all 7 beads are on their pins.

Now we are going to hook all of the beads together in a rosary style chain using the 4mm jump rings
Using your left hand, hold a jump ring firmly with your flat nose pliers. Using the jump ring tool on your right hand twist your wrist to open jump ring. Add 2 or your beaded pins. Twist your wrist to close the jump ring, making sure the ends line up tightly.
Twist back and forth to line up the ends of the jump ring if you need to.


Continue this process until all of your beaded pins are hooked together in a chain.
Using a ruler, measure your beaded chain. You should have about 5 or 6 inches. If your beads are small, you will need more of them to make a chain this long, or less beads if they are larger.
Now the hard part - you need to do the math . I want my necklace to be 18 inches long. Subtract the length of your beaded chain from 18, and that tells me i need 12 inches of chain, or 6 inches on each side.


Hook the bird connector to one end of your beaded chain with jump ring.

Hook the chain piese to each side of your beaded lenght using the jump rings.
Measure the chain and cut necessary length for each side of the necklace.

The chain I am using has links that open using the jump ring tool. If your chain has soldered links, cut it with the shears.


Attach the lobster clasp to one end of the necklace with a jump ring.Attach the 7 mm jump ring to the other end.


And You're done  !!!


_______________________________________________________________________
This tutorial was brought to you by Shadow Jewels. Shadow design wonderful Shabby chic and Victorian style jewelry using vintage rhinestone, lampwork glass, crystal beads and Genuine gemstone briolettes.


Friday, November 18, 2011

Almond Biscotti Recipe

Almond Biscotti Recipe 

Angela from Windy City Knits here with my recipe for Almond Biscotti. I make this twice baked cookie all the time and I get so many people asking me for my recipe. I am Italian and I have always loved my grandmother's Anise Raisin soft style biscotti, but I wanted to adapt it for a harder cookie to dunk in coffee. I make these in double batches and wrap in pretty packages for holiday gifts too.


Angela's Almond Biscotti 

2-3 cups flour
2 teaspoons baking powder
1/2 teaspoon salt
1/2 cup butter (1 stick), softened
1 cup sugar
2 eggs
2 teaspoons vanilla
1/2 cup lightly toasted sliced almonds
 Preheat oven to 350 degrees F. In a large bowl, cream together the butter and sugar. Add the eggs and vanilla and mix well. In a separate bowl, combine flour, baking powder, and salt. Add dry ingredients to butter mixture and mix together.

Now determine whether you need to add more flour. If your mixture is very sticky, add 1/4 - 1/2 cup more flour. If your mixture is just barely sticky or not sticky at all, go to the next step.

Flour a counter or board and turn out the dough. Pat the dough into a circle and then divide into two pieces. Work with one piece at a time and roll into a long thin baguette log shape approximately 14-16 inches long and lay onto a lightly greased cookie sheet.

Bake for 20-25 minutes or until very light golden in color. Remove from oven and let cool 15 minutes. Turn oven down to 300 degrees F.

Slice each log on the diagonal into 1 inch pieces. Lay the slices on their sides and bake another 8 minutes. Then flip them to their other side and bake another 5 minutes. Let them cool and serve with coffee or tea.
_____________________________________________________________
Angela from Windy City Knits enjoys creating beautiful and cozy stylish hand knits. Her  inspiration comes from nature! She loves earth tones, sandy beach beige, ocean blues, meadow greens, city shades of grey, summer sky spectrum. In her store you can find gorgeous cozy scarfs, beautiful gloves, and stylish hats. .


In her store you will find beautiful winter accessories check it out!


Pin It

Tuesday, October 18, 2011

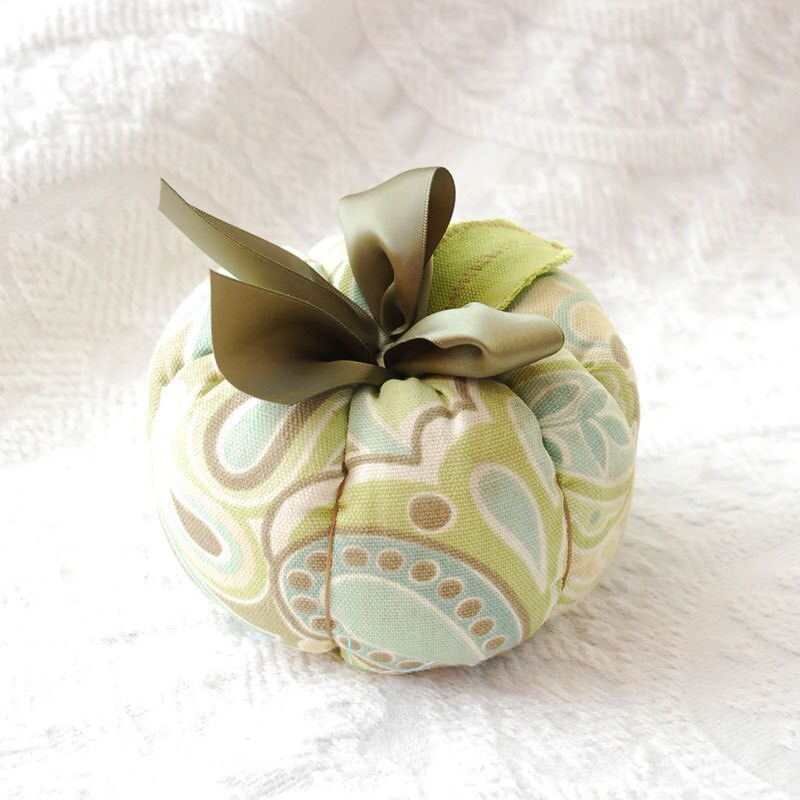
Fabric Pumpkin Tutorial


Fabric pumpkin

Fabric Pumpkin Tutorial
Jen from BoutiqueVintage72 brings us a wonderful tutorial showing how to make a fabric pumpkin. These fabric pumpkins make the perfect Autumn decor. Any color or print fabric can be used and you can pack them up at the end of the season and use them every year.


Jen is an ex-pastry chef, with a serious jones for crafting and a commitment to living green.
Visit her delightful shop, BoutiqueVintage72 that has a strong message - to create a one-stop gift shopping experience, filled with beautiful things, thoughtfully created with interesting and often recycled materials.


Related Posts Plugin for WordPress, Blogger...